Step 1 – Safety and Pre-Firing Checks
Before switching on the kiln, take a few minutes to prepare:
Check the elements – make sure they are intact and not sagging or broken.
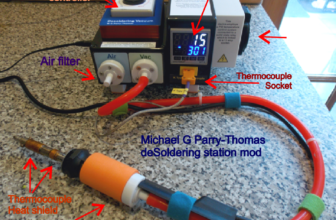
Check the thermocouple cable – the protective covering should not be damaged.
Power on the controller – confirm it starts up normally with no error messages.
Vacuum the kiln base – remove dust and small particles. This step is especially important in glaze firings, as loose debris can settle onto your pots and ruin the finish.
Check under the kiln – remove any rubbish, paper, or debris that may have gathered over time.
For cleaning your pots, I prefer using a dry brush to remove dust from the bisque surface. Some potters wipe with water, but brushing avoids unnecessary moisture.
Step 2 – Understanding the Basic Controller
A basic kiln controller usually allows you to set three things:
- Ramp rate – how quickly the kiln heats up.
- Target temperature (set point) – the final temperature for that segment.
- Soak/Hold time – how long the kiln maintains the set temperature.
Step 3 – Preparing Shelves and Pots
Always apply batt wash (e.g. HotClay SKU: F086) to your kiln shelves.
Make sure your ceramic items do not touch each other – if they do, they will fuse together.
After glazing, wipe all glaze from the base of your pots. Even a small amount will cause sticking.
Many potters use wax resist (e.g. HotClay SKU: F-END) to stop glaze from settling on the base.
Even if wax resist is used, I still wipe the bottoms of my pots – just to be sure no glaze beads remain.
Using wax resist reduces clean-up, but double-checking ensures you don’t lose work to stuck pots.
Step 4 – Glazing
Glaze comes in different forms:
Powdered glaze – mixed with water (and sometimes additives). Always follow your supplier’s instructions for the correct consistency.
Ready-mixed brushing glazes – easy to use and good for experimenting with effects.
Tips for glazing:
Match your glaze to your clay body – your supplier can advise on the best pairings.
For example, I often use a clear glaze and add a brushing medium (developed by PotteryTech).
Apply glaze evenly whether dipping or brushing.
Allow the glaze to dry overnight before firing for the best results.
Step 5 – Example Firing Schedule
Here’s a glaze schedule I commonly use:
Bisque firing (VC06): 1000 °C
Clear glaze firing: 1125 °C
Ramp rate: 150 °C per hour
Soak/Hold: 30 minutes at 1125 °C
Cool down: allow the kiln to cool naturally
Step 6 – Firing Safety
Always run your kiln with extraction or ventilation switched on to remove fumes and pollutants.
✅ With these steps, your glaze firing will be safer, cleaner, and more reliable, helping you achieve consistent results with your ceramics.
Glaze Firing Quick Checklist ✅
Pre-Firing Safety
☐ Check kiln elements – intact, no sagging or breaks
☐ Check thermocouple cable – covering undamaged
☐ Power on controller – no error messages
☐ Vacuum kiln base – remove dust/particles
☐ Check under kiln – no rubbish or paper
☐ Clean pots – use a dry brush, avoid water
—
Controller Settings
☐ Ramp rate – set speed of heating
☐ Target temperature – correct set point
☐ Soak/Hold – time at final temperature
—
Preparing Shelves & Pots
☐ Apply batt wash to shelves (Hot Clay SKU: F086)
☐ Pots not touching each other
☐ Wipe glaze from bottoms of all pots
☐ Clean slightly up the lower sides – glaze can run
☐ Use wax resist if needed (e.g. SKU: F-END)
☐ Double-check bases are completely clean
—
Glazing
☐ Stir glaze thoroughly before use
☐ Match glaze to clay body (ask supplier if unsure)
☐ Even application – thin, consistent layers
☐ Allow glaze to dry overnight before firing
—
Example Firing Schedule
Bisque (VC06): 1000 °C
Clear glaze firing: 1125 °C
Ramp rate: 150 °C/hour
Hold/Soak: 30 minutes
Cool naturally
—
Firing Safety
☐ Ventilation/extraction switched on
☐ Kiln area clear of clutter
—
Troubleshooting Reminders
Glaze runs → Clean higher on pot + thinner coats
Pinholes → Slow down ramp or add soak
Uneven glaze → Stir + apply thinner coats
Crawling → Avoid dirty bisque or thick glaze
Cloudy clear → Try different glaze for clay body
Kiln Firing Log book
Plan, log, and visualize your kiln firing cycles
Handout by Michael G Parry-Thomas · PotteryTech.net