Pottery app tools
Kiln Firing Log book
Designed to make tuning & balancing kiln firings easier.
Glaze Recipes Log Book
Ceramic Glaze Log Book Track, calculate, and save your glaze recipes
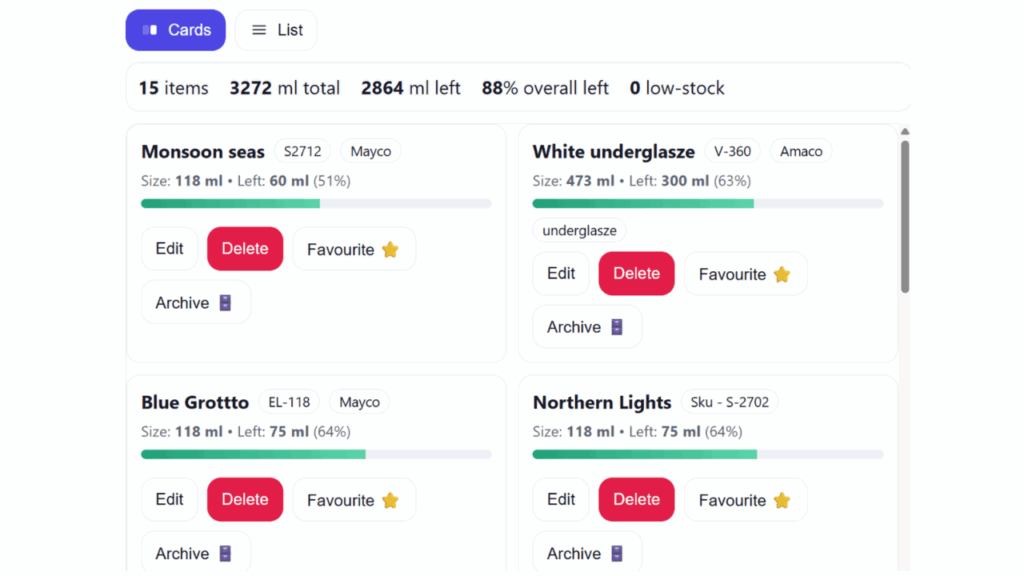
Glaze Stock Management
Track ready-mixed brushing glazes. Save locally; export/import..
✅ Capabilities: What Kiln Pro Sim Core v60.9 CAN Do
- Thermodynamics: Simulates PID controller adjustments, ambient heat loss, and thermal mass.
- Heat Work Calculations: Calculates Orton Cone bending based on time *and* temperature, not just static target temps.
- Chemical Phases: Tracks time spent in critical zones like Water Smoking, Carbon Burnout, and Quartz Inversion.
- Decorating Firings: Simulates covercoat burnoff and ventilation issues for decals/lusters.
- Catastrophic Failures: Demonstrates steam explosions from fast ramping and meltdowns from over-firing.
- Hardware Wear: Allows you to lower element capacity to see how old or broken coils affect a firing schedule.
❌ Limitations: What Kiln Pro Sim Core v60.9 CANNOT Do
- Glaze Chemistry: Does not simulate glaze color changes or specific glaze ingredient reactions.
- Kiln Atmospheres: Assumes an electric oxidation environment. It cannot simulate gas reduction, wood firing, or raku.
- Cooling Cycles: Currently focuses on the heating ramp; it does not simulate slow cooling holds for crystalline glazes.
- Exact Real-World Guarantees: Every physical kiln has unique insulation, drafts, and thermocouple wear. This is an educational tool, not a replacement for kiln sitting!
🧪 How to Measure Clay
To get accurate shrinkage data, you need to create a test tile.
- Prepare: Roll out a clay slab (approx. 5mm thick). Cut a rectangle roughly 110mm x 50mm.
- Mark: Carefully draw a line exactly 100mm long on the wet clay surface.
- Drying: Allow the tile to dry completely (Greenware). Measure the line again.
(Enter this as “Greenware mm”) - Firing: Fire the tile to your final glaze temperature. Measure the line one last time.
(Enter this as “Glaze mm”)
Tip: Input these numbers into the Lab to generate a custom ruler that does the math for you!
📏 Ruler Types Explained
Standard Ruler (0 ➜ End)
- Layout: Starts at 0 on the left, counts up to the right.
- Best For: Slab building, cutting templates, height measurements, and general studio work.
- Why use it? If you want a 20cm finished mug, measure 20cm with this ruler on wet clay. It effectively measures “22.4cm” (depending on shrinkage) but labels it “20”.
Center-Zero Ruler (Wheel)
- Layout: 0 is in the middle. It counts upwards to the left and right (e.g., 15 – 0 – 15).
- Best For: Wheel throwing.
- Why use it? Place the 0 on the center pin of your wheel-head. You can instantly check the width of bowls or plates from the center out, ensuring perfect symmetry without doing mental math.
🚀 PotteryTech Kiln Simulator: Quick Start Guide (Click to Open)
▼1. Set Your Schedule (The Controller)
Choose your mode on the left panel:
- Cone Mode: Auto-calculates temp (e.g., select Cone 04 for Biscuit).
- Ramp Rate: How fast heat rises.
Safe: 60°C–100°C/hr.
Danger: >150°C/hr (Risk of steam blowouts!).
2. Check Hardware (The Sliders)
Simulate the age of your elements:
- 100%: Brand new. Firing is efficient.
- < 50%: Old/Worn. Watch the graph—the Red line may “stall” and fail to reach target.
3. Simulation Speed (⏱️ Important)
Located above the kiln view:
- Real-Time Runs second-by-second. Best for watching PID power adjustments.
- Hyper (Default) Compresses 8 hours into ~30 seconds. Use this to quickly generate the Analysis Report.
4. Fire & Analyze
Press ▶ START. If the pots turn into a 💥 symbol, you fired too fast! Scroll down for the final Analyst Report.
🎓 What You Will Learn
- The Moisture Limit: Why “Bone Dry” matters. Firing wet clay >100°C/hr causes explosions.
- Heat Work: Why temperature + time (Soak) creates a mature firing.
- Hardware Diagnostics: Recognize failing elements before they ruin a real firing.
introducing the PotteryTech Glaze Lab, the digital brain for your Penetrometer tool. This application replaces the messy paper notebook with a smart, interactive dashboard.
How it helps your studio:
Replicate: Use the “Compare” feature to match today’s batch against a successful firing from six months ago.
Measure: Take 3 readings per coat to account for hand variance.
Analyze: The app automatically calculates the average and plots it on a variance graph.
Standardize: Set a “Target Thickness” line on the graph and keep applying layers until you hit the green line.
Why Use the Clay Hardness Lab?
In ceramics, consistency is key. Using clay that is too hard can break expensive slab rollers, while clay that is too soft can collapse on the wheel. This app removes the guesswork.
📊 Laboratory Grade Logging
🛡️ Equipment Safety Zones
🔴 Red Zone: Too hard! Risk of damage to slab rollers and extruders.
🟠 Orange Zone: Ideal for stiff slab building.
🟢 Green Zone: Perfect plasticity for wheel throwing.
🔵 Blue Zone: Soft clay for extruders and slip.
Note: You can customize these ranges in the Config menu to match your specific studio equipment.
💧 Smart Hydration Calculator
🏭 Multi-Profile Studio Management
- Each profile gets a unique color-coded theme.
- Filter your library to see only tests from specific users.
- Generate professional PDF Reports for inventory records.
📱 QR Code Integration
📉 Compare & Analyze
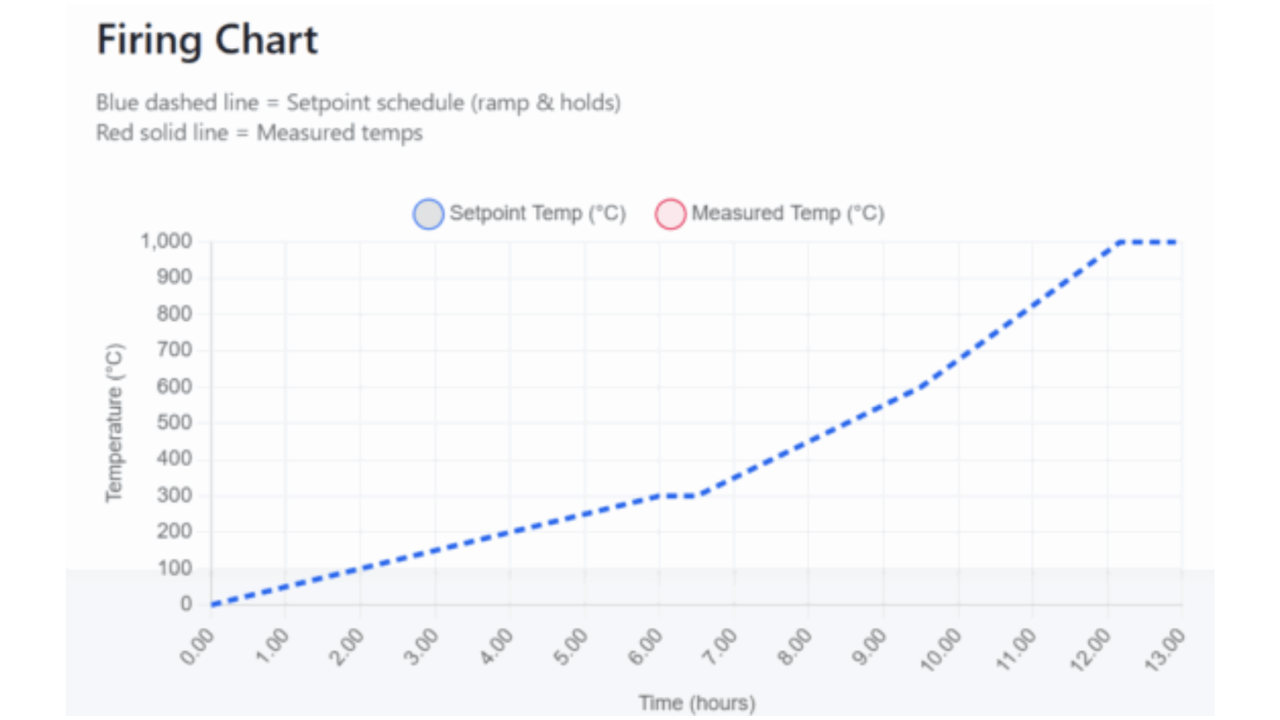
Kiln Log Book Pro : Intelligent Real-Time Graphing
Visualize your firing progress with our dual-line graphing engine. Compare your Blue Planned Schedule against your Red Reality Line in real-time.
- Interactive data tooltips showing exact time and temperature.
- Independent toggles to hide/show data labels for a cleaner view.
- Automatic time calculation with optional soak/hold integration.
Kiln Batt Integration
The only logbook built to work with physical kiln loading. Seamlessly link your digital records with the Kiln Batt Reference Template.
- Sketch pot positions on paper first to ensure 100% data accuracy.
- Direct link from the logbook to your custom batt shape generator.
- Transfer handwritten glaze notes into searchable digital cards.
Smart Merge Digital Archive
Manage years of firing data without clutter. Our advanced archival system allows for total control over your studio history.
- Deep Search: Find logs by Date, Kiln, Pot ID, or Firing Type (Bisque, Lustre, etc.).
- Smart Merge: Import data from different years and merge them into one master file.
- Visual Badges: Red-Orange color-coded badges for instant identification of firing categories.
Professional A4 Reporting
Turn your digital data into professional physical documentation. Perfect for gallery records or studio inspections.
- Optimized print layout that spans multiple A4 pages cleanly.
- Automatic page-breaks ensure graphs and tables are never cut in half.
- High-contrast design for easy reading in workshop lighting.
🧪 Clay . Specific Gravity Lab User Guide
What is this tool and why should I use it?
PotteryTech: Clay . Specific Gravity Lab is a digital notebook and calculator designed specifically for ceramic technicians and potters. It replaces paper logs and manual calculations.
The Main Advantages:
- ✅ Consistency: Ensures your glaze is the exact same thickness every firing, preventing running, crawling, or thin application.
- ✅ Speed: Instantly calculates Specific Gravity (SG) without you needing to do the math.
- ✅ Data Safety: Saves your records locally. You can export them to a file to keep a permanent history of your batches.
- ✅ Fixes Mistakes: The built-in “Dilution Fixer” tells you exactly how to fix a thick glaze (see below).
How to use the Density Calculator
This section uses a standard Density Cup (often 100ml) to measure the Specific Gravity (SG) of your liquid clay or glaze.
- Weigh Empty: Place your clean, dry cup on a scale and enter the weight in the “Empty (m1)” box.
- Fill & Weigh: Fill the cup with your glaze, put the lid on (wipe away excess), and weigh it again. Enter this in the “Full (m2)” box.
- Check Volume: Ensure the “Cup Volume” is set correctly (Standard is 100ml).
💧 The “Water Glaze Dilution Fixer” (Killer Feature)
This is the most powerful tool in the lab. Usually, when a glaze is too thick, potters guess, add a splash of water, mix, and test again. This wastes time.
How the Fixer works:
- Current SG: Enter the result you just got (e.g., your glaze is 1.65, which is too thick).
- Target SG: Enter what you want it to be (e.g., 1.50 for a dipping glaze).
- Total Volume: Estimate how much glaze you have in the bucket (e.g., 5000ml).
Included Lab Converters
The “Lab Tools” section includes handy converters for common ceramic tasks:
- Baumé to SG: If you use a glass hydrometer, enter the °Bé reading to get the precise Specific Gravity.
- Pint Weight: Converts the traditional method (weight of a pint jar) into modern scientific SG.
- Grams to Lbs/Oz: Useful when mixing glaze recipes from books using different measurement systems.
- Litres to UK Pints: Helpful for estimating bucket volumes.
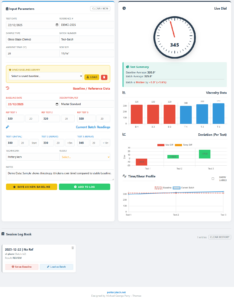
Follow these steps to record and compare your viscosity tests:
-
1. Enter Batch Details (Blue Section):
Fill in the Date, Reference, Batch Number, and Temperature in the top (Blue) section. -
2. Set the Baseline (Red Section):
To compare this batch against a standard, you must load data into the Red section.
Option A: Use the “Saved Baselines Library” (Yellow box) to load a preset.
Option B: Scroll to a previous test in the Log Book and click “Set as Baseline”. -
3. Perform 3 Tests:
Enter your readings in the Blue inputs.
• Test 1: Initial reading.
• Test 2: After 1st time lapse (e.g., 5 mins).
• Test 3: After 2nd time lapse (e.g., 10 mins). -
4. Analyze:
Check the Time/Shear Profile graph. If the line goes UP, your material is thickening over time (Thixotropic). -
5. Save:
Click “Add to Log” to save the entry to your session history list below.
Note: Always ensure you use the same wire and bob size when comparing results.
🏺 PotteryTech — Cone Pack Firing Workflow
Follow these steps in order. Each stage links your tools and templates together for consistent kiln analysis.
1️⃣ Prepare Your Cone Pack
- Open the Pyrometric Cone Pack Set Finder Tool.
- Use it to select your target cones for the firing.
- Assemble your cone pack according to the tool’s recommendations.
2️⃣ Mark Your Kiln Batt Reference Template
- Print the Kiln Batt Reference Template.
- On the paper template, mark the exact location of each cone pack.
- Make sure the same location numbers are marked on the cone pack itself.
- Place each cone pack in the kiln in its marked position.
3️⃣ After Firing — Record the Cone Angles
- After the kiln cools, use the Orton Cone Angle Template to measure how far each cone has bent.
- Write down each angle beside its location number on the printed batt template.
- No need to look up temperatures — this will be handled automatically by the next tool.
4️⃣ Enter Angles into the Cone Angle → Temperature Tool
- Open the PotteryTech — Cone Angle → Temperature tool in your web browser.
- Follow the on-screen prompts.
- Enter each cone’s:
- Target cone (e.g., Cone 06, Cone 04, etc.)
- Heating rate (°C/hr)
- Measured angle (°)
- Optional soak time (min)
- The tool will automatically generate a data line like:
09/10/2025, 00:15:22 | Cone 06 (self) @ 100°C/hr | 60° | soak 0 min → 1000.7°C
5️⃣ Analyze Results in the Cones Analytic Tool
- When all your cone data lines are ready, open the PotteryTech — Cones Analytic Tool.
- Paste or import your cone data into the tool.
- The app will process each kiln batt and display:
- Temperature variations across the kiln
- Average temperatures by layer (top / middle / bottom)
- Heat-work distribution visuals
- This gives you a clear view of how evenly your kiln is firing and helps fine-tune your firing schedules.
🎯 Tip: Keep all your printed templates together with the final analytic charts for easy reference in future firings.
© PotteryTech — Part of the Weather-Above Network • potterytech.net
Bullers™ Rings — Compact Help
What you’ll need
- Bullers™ Rings (e.g., TR27/84)
- Underglaze pencil (to mark reference numbers)
- Digital calipers
- Printed Kiln Batt Reference Template
- Bullers™ Rings Heatwork tool (data entry)
- Bullers™ Rings Analyze tool (graphs & comparisons)
Step 1 — Print your Batt Reference Template
- Download and print the template matching your batt shape (round/oval/square/hex).
- Use it as your numbering map: layer (Top/Middle/Bottom or Batt 1/2/3) and position (Compass-9 or Clock-12).
Step 2 — Place and label the rings
- Place rings on each batt at the chosen template positions.
- Mark each ring with an underglaze pencil (e.g., “Top 1N”, “Middle 1C”, “Bottom 1S”).
- Fire as normal.
Step 3 — Measure after firing
- After cooling, remove rings and measure the fired diameter with digital calipers.
- Write each measurement onto your printed template next to its reference.
Step 4 — Enter results in the Bullers™ Rings Heatwork tool
- Open the Bullers™ Rings Heatwork tool.
- For each ring enter: Layer, Location, Ring size, and your Target °C.
- Copy the notes/export text (the tool generates it).
You’ll see heatwork temperatures calculated from the response curve, and how they compare to your target.
Step 5 — Analyze in the Bullers™ Data Analyzing tool
- Open the analyzer, paste the export text, then click Parse Pasted Data.
- Use the charts:
- Heat Map — hot/cool spots vs layer average (with optional batt overlay & dot size). <
- Bar — Temps — absolute °C per position (target line shown).
- Bar — Δ vs Layer Avg — deviation from layer average (edge/corner drift).
- Radar — Compass Averages — mean by direction (Back/Front/Left/Right), per layer or all layers.
- (Optional) Overlay All Layers to compare layers together.
- Use Compare to log Δ °C between two points; it appends to the Notes box (save as .txt).
Decide adjustments
- Cool edges → add soak or raise top temperature slightly.
- Top vs Bottom drift → adjust stacking/venting or soak longer.
- Re-test next load and compare runs; keep notes each time.
Tips & troubleshooting
- Δ chart empty? Click “Parse Pasted Data”; a single reading shows Δ = 0.
- No data? Paste the full export (must include “Rings — … Temp … °C/deg C …”).
- No target line? Ensure export includes “Target: 1000.0 °C” (or your value).
- Positions missing? Analyzer understands Compass-9 (N, NE, …) and Clock-12 (1–12). Top/Middle/Bottom are auto-mapped if needed.
- Dots too small / batt overlay? Use the dot size menu and batt overlay (round/oval/square/hex) with width/height.
🔥 Kiln Batt Reference Template – Instructions
▶️ What It Does & How to Use
📄 Purpose
The Kiln Batt Reference Template is designed as the first step in mapping your kiln’s internal heatwork zones. Use it to record where each Bullers™ Ring or temperature reference point is positioned on each layer of your kiln (Top – Middle – Bottom).
🧭 Setup
- Print the Reference Template for your kiln shape (Round / Square / Hex / Oblong).
- Mark each ring location according to the Compass-9 (N, NE, E, SE, S, SW, W, NW + Centre) or Clock-12 numbering layout.
- Label each position with a number and short note — e.g. “1 = Top NE”, “2 = Bottom SW”.
🎯 Use Before the Heatwork Tool
Complete this template before firing and note exactly where every Bullers Ring will sit. After the firing, record each ring’s measured BRV value or temperature equivalent in the Bullers™ Rings Heatwork Tool.
This ensures that your post-firing heatmap or temperature-difference graph correctly matches the physical locations shown on the Kiln Batt Reference Template.
📊 After the Firing
- Compare Top / Middle / Bottom layers for evenness of heatwork.
- Note hot- or cold-spot trends across firings — useful for adjusting firing schedules or element balance.
- Keep the completed sheets in your Kiln Firing Log Book for long-term records.
🖨️ Printing & Saving
- Click “Printable Reference Template” in the tool interface to open a print-ready layout.
- Print or export as PDF for each firing batch (Top / Middle / Bottom pages).
ℹ️ Related PotteryTech Tools
🏺 Part of the PotteryTech Tools Suite — helping potters measure and map their kiln performance with precision.
🔥 PotteryTech.net – Digital Kiln Calibration & Heatwork Tools
PotteryTech.net provides free, interactive tools for potters who want to understand and calibrate their kiln’s heatwork more accurately.
For those using Bullers™ Rings, PotteryTech offers:
- Kiln Batt Reference Template – a printable layout to record ring positions within your kiln.
- Bullers™ Rings Heatwork Tool – automatically converts Bullers™ Ring measurements into temperature and shrinkage data.
- Bullers™ Data Analyzing Tool – visualizes your kiln’s heat distribution with graphs, averages, and hot/cold spot mapping.
For those using Orton’s Pyrometric Cones, PotteryTech provides:
- Cone Pack Set Finder – helps select and label cone packs for accurate placement and firing.
- Cone Angle → Temperature Tool – converts post-firing cone bend angles into equivalent temperature data.
- Pyrometric Cone Analysis Tool – lets you compare target, guard, and witness cone results to track firing performance over time.
Whether you use Bullers™ Rings or Orton’s Cones, PotteryTech’s online tools turn traditional heatwork measurement into modern digital analysis—helping potters solve kiln problems, fine-tune firing schedules, and achieve more consistent glaze results.
Learn more and try the tools at PotteryTech.net
Pyrometric Cone Pack Set Finder Tool
The Pyrometric Cone Pack Firing Set Finder helps you to Make a Cone Pack match kiln firing temperatures to the correct Orton cones. It generates a cone Pack set (Guard, Target, Witness), and shows your results on a clear chart you can save or copy into your kiln log book.
Pyrometric Cone Angle → Temperature Tool
🧰 How to use: Cone Angle → Temperature Help
Quick start
- Select Cone and Type (Self-supporting or Large/Standard).
- Enter your kiln’s final Heating rate (°C/hr) and any Soak at peak.
- Measure the cone’s bend on your Orton angle template, then set the Bend angle slider/number.
- Read the estimated Temperature (°C). Click ➕ Append to Notes to add a log line.
- When finished, click 📋 Copy notes and paste into your kiln log book.
Inputs explained
What the tool does
- Anchors 90° (“melted”) to Orton’s equivalent temperatures for your cone, type, and rate.
- Interpolates temps between your calibration angles (0°, 30°, 60°, 90° by default).
- Applies a soak adjustment (rule-of-thumb) after the angle estimate.
- Lets you tweak the Calibration table per session if your results differ — the graph updates live.
Copying to your kiln log
- Each reading creates a plain text line like:
YYYY-MM-DDThh:mm:ssZ | Cone 06 (self) @ 100°C/hr | 60° | soak 0 min → 1010.3°C - Use ➕ Append to Notes for each cone set, then 📋 Copy notes.
- Paste into your kiln log (digital or paper). Done.
Tips
- Use the Snap buttons (30°, 60°, 90°) for quick matching with the template marks.
- If your kiln holds at peak, try Soak: Medium to simulate roughly ~1 cone over ~90 minutes.
- Fine-tune the curve: add a row in Calibration (e.g., 45°) if you’ve got repeatable mid-bend data.
Troubleshooting
Temps look high/low
Adjust the calibration points (especially 60°) to match your clay/glaze system and witness cones.
Odd jumps on the graph
Ensure angles in the calibration table are in ascending order and within 0–90°.
Template: download the Orton Angle Template from PotteryTech.net and print at 100% (“Actual size”).
Pyrometric cones bend at specific angles depending on the heatwork (temperature + time) during firing. This tool lets you enter the bending angle of an Orton cone and converts it into an estimated equivalent temperature, based on standard heating rates. Perfect for checking finished firings or logging cone results in your kiln log book.
📘 Kiln Firing Log Book – Instructions
▶️ How to Use
🔥 What the App Does
- Plan and record kiln firing schedules.
- Add multi-ramp segments with hold times.
- View firing curves on a temperature graph.
- Save, load, print, and back up your sessions.
🚀 Getting Started
- Open the app in your browser.
- Start with the current kiln temperature (usually room temp).
- Add your first ramp segment (target temperature, ramp rate, hold time).
- Click ➕ Add Segment to build your firing schedule.
📈 Graph View
- The firing graph updates when you click on Generate Schedule.
- It shows temperature vs. time, so you can check your curve.
- Hover or tap points for details.
💾 Saving & Loading
- 💾 Save Session → download your firing log.
- 📂 Load Session → reload a saved program.
- Use different filenames for different kilns or firing types.
☁️ Backups
- Press 📤 Backup to save a safety copy.
- Store backups on your computer or cloud (Google Drive, OneDrive, Dropbox).
- You can merge backups if needed.
🖨️ Printing & Reports
- 🖨️ Print Log → paper copy for studio records.
- 📑 Export PDF → digital logbook for archiving or sharing.
🔍 Tips
- Note the kiln load (light, medium, heavy) for accuracy.
- Add glaze/bisque/decal notes in the session for future reference.
- Regularly back up sessions to avoid losing your firing history.
🌐 Learn more at PotteryTech.net
📘 Glaze Log Book – Instructions
▶️ How to Use
🧪 What the App Does
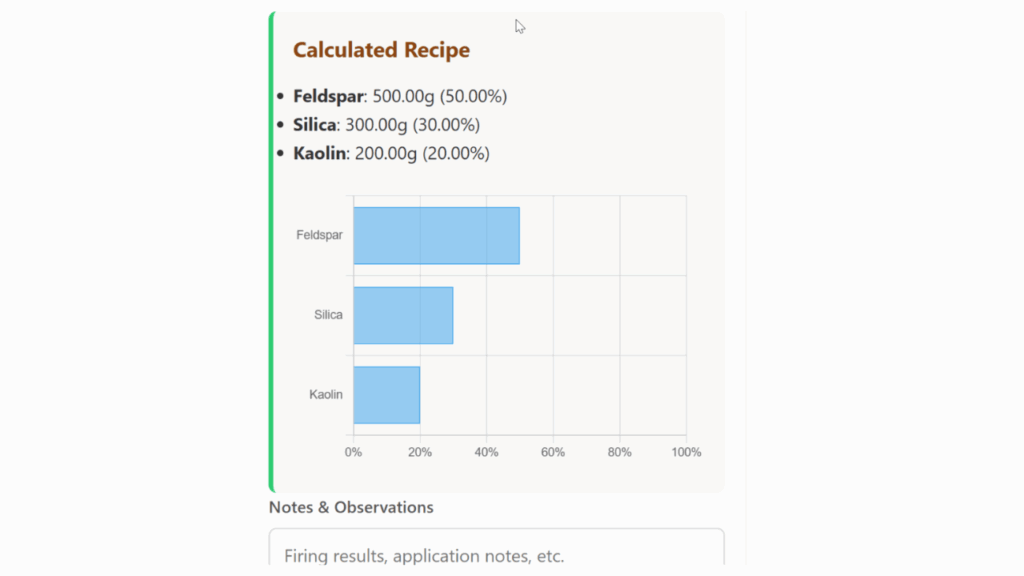
- Keep a digital record of glaze recipes.
- Store ingredients with percentages.
- Generate graphs to see glaze composition visually.
- Save, load, print, and back up your glaze library.
🚀 Getting Started
- Open the app in your browser.
- Enter the glaze name (e.g., “Celadon Green”).
- Add ingredient names and percentages.
- Click ➕ Add Ingredient until the recipe is complete.
- Click Save Recipe to log it.
📊 Graph View
- The bar graph shows ingredient percentages.
- This helps compare silica, alumina, fluxes, etc.
- Great for teaching or checking balance at a glance.
📋 Managing Recipes
- Use the list to browse all saved recipes.
- Edit ✏️ to update ingredients or notes.
- Delete 🗑️ to remove a recipe.
💾 Saving & Loading
- 💾 Save Recipe Book → download all recipes.
- 📂 Load Recipe Book → upload saved data.
- Each file can hold multiple recipes.
☁️ Backups
- Press 📤 Backup to make a safety copy.
- Store in a cloud folder (Google Drive, Dropbox, OneDrive).
- Back up regularly to keep your library safe.
🖨️ Printing & Reports
- 🖨️ Print Recipe → paper copy for workshop use.
- 📑 Export PDF → save or share recipes digitally.
🔍 Tips
- Always check percentages add up to 100%.
- Keep clear notes on cone range and finish (matte, glossy, satin).
- Add test tile results so you remember how it fired.
🌐 Learn more at PotteryTech.net
📘 Glaze Stock – Instructions
▶️ How to Use
🏺 What the App Does
- Keep track of all your brushing glazes.
- Record name, colour, and notes.
- Save, load, print, and back up your stock.
🚀 Getting Started
- Open the app in your browser.
- Fill in glaze details in the form.
- Click ➕ Add Glaze to add it to your list.
📋 Managing Your List
- Use the search bar to find glazes quickly.
- Press ✏️ Edit to update details.
- Press 🗑️ Delete to remove a glaze.
💾 Saving & Loading
- 💾 Save Stock → download your glaze list.
- 📂 Load Stock → upload your saved list.
☁️ Backups
- Press 📤 Backup to save a copy.
- Store backups on your computer or cloud (Google Drive, Dropbox, etc.).
- You can also merge backups with your current list.
🖨️ Printing & Reports
- 🖨️ Print Report → paper copy for studio use.
- 📑 Export PDF → digital record or to share.
🔍 Tips
- Keep names consistent for easier searching.
- Always note cone range and finish (matte, glossy, satin).
- Back up often to keep your data safe.
🌐 Learn more at PotteryTech.net
A digital (PDF) version of Orton’s Cone Template. Pocket Size Measuring Template for Orton Large and Self- Supporting Cones. Temperature equivalents are on the back in Celsius. Great for measuring the bending angle af a fired cone!
PotteryTech — Bullers™ Rings Heatwork
Everything you need to use the in-browser kiln log: add ring measurements, set a target, print the graph, and copy neat notes.
What is this tool? Overview
The app converts Bullers™ rings final diameters into BRV and approximate heatwork temperature using editable correlation tables for each product code.
- Enter ring labels and final Ø (mm).
- See per-ring BRV, temperature, and shrink %.
- Set a target temperature to see which rings are above/below/near it.
- Copy a clean notes block for your kiln log or Print the graph.
Quick start (2 minutes)
- Choose Product code (e.g., TR27/84).
- Select Temperature scale (°C / °F).
- (Optional) Enter Unfired nominal Ø for shrink %.
- In Ring measurements: type a Label and the Final Ø (mm), then press Enter or click ➕ Add.
- (Optional) Set a Target temperature. Use Avg or Snap to nearest table temp.
- Insert to notes and/or Print Graph.
Fields & controls
- Product code — switches to that product’s correlation table.
- Temperature scale — displays in °C or °F.
- Unfired nominal Ø (mm) — used only for shrink %.
- Target temperature — dashed line on the graph. ▲ hotter / ▼ cooler / ● near vs. target.
- Avg — sets target to the average of current ring temps.
- Snap to nearest table temp — rounds target to a row in the active table.
- PDF buttons — open Weather-Above or Mantec PDFs for the selected product.
Graph & target line
- X-axis: Ring size (mm) (larger = cooler). Y-axis: Temperature.
- Green donuts mark rings. Colour vs. target: ▲ hotter, ▼ cooler, ● near.
- Graph + / Graph − resizes manually; it also auto-grows with many rings.
- Toggle Show labels for leader-lined labels.
Notes & copying
- Insert Header → Notes — adds timestamp, operator, kiln ID, load ref, product, scale, unfired Ø, and summary (Avg, BRV, Δ span, Target).
- Insert Rings → Notes — lists each ring (size, BRV, temp, shrink %, and ▲/▼/●).
- Insert Product Table → Notes — pastes the active correlation table.
- ASCII-safe copy — replaces special characters for older systems.
- Copy Notes — copies HTML + plain text; if blocked, downloads a .txt.
Editing the product data table
- Columns: Temp (°C) | BRV | Ring Size (mm).
- Add row to insert, Delete to remove; keep it sorted by Ring Size high→low.
- Ring temperatures are linearly interpolated between nearest sizes.
Printing the graph
- Use Print Graph — opens a print-ready page with the large SVG + legend.
- Choose Landscape. Optionally enable “Print background graphics”.
Theme (Light / Dark)
- Pick the theme from the app’s top right menu.
- Auto follows your system setting.
- The choice is saved locally in your browser.
Troubleshooting
Temps show “—”
- Check ring sizes are valid numbers and within the table range.
- Reset Product & Table to restore defaults.
Graph crowded / tiny
- Use Graph + to increase height.
- Turn off Show labels for large batches.
Wrong units in notes
- Select the correct Temperature scale before inserting to Notes.
FAQ & Privacy
Can I change/save the tables?
You can edit rows live. To keep a custom set, copy the product table to Notes or save the page.
What do ▲ / ▼ / ● mean?
Comparison vs. target: ▲ hotter, ▼ cooler, ● near.
Data & privacy
- Everything runs in your browser (no uploads).
- Theme is stored in local storage.
- Copy Notes uses your clipboard; if blocked, a .txt file is downloaded.
kiln logbook, Kiln Log Book Pro, Glaze Recipes Log Book, Glaze Stock Management Tool, Pyrometric Cone Pack Set Finder Tool plus Orton Cone Angle → Temperature Tools and a PotteryTech — Bullers™ Rings Heatwork tool, Clay hardness Lab, Clay Specific Gravity Lab ,Clay Ruler Shrinkage lab, Viscometer log book,Viscometer Template
Designed program by Michael George Parry-Thomas
Pottery tech has created a range of tools including a kiln logbook, a Glaze Recipes Log Book, and a Glaze Stock Management Tool, Pyrometric Cone Pack Set Finder Tool and Orton Cone Angle → Temperature tool
The Glaze Stock Management Tool offers an efficient method for tracking your jars of brushing glaze. The app enables you to monitor and store information directly on your computer. When you access the form . Add or Edit, you can input details about your brushing glaze such as the glaze name, brand, stock number, container size, and the remaining amount in millilitres. Additionally, you can include tags, references, and notes, and then click the save/update button. After this, you can clear the form using the clear form button, making it easy to enter the next glaze.
On the right side, there’s a window displaying your glaze stock, featuring a graphic line that shows how much material you have left. This helps you manage and locate your glazes more efficiently, preventing you from losing track of those small brushing glazes you’ve bought. By using this glaze stock manager, you can easily find and manage your preferred glazes, as well as have the information on hand for reordering from your supplier.
I hope these tools prove to be beneficial; I originally designed them for my own use but decided it would be valuable to share them with fellow hobbyists in ceramics and pottery to help organize their data. Please be aware that no data is stored on our servers, and we do not back up any information entered in the forms. You are responsible for your data, so it’s recommended that you save a backup on your computer and print a hard copy to keep in a binder.
I use all the programs and save my files to my cloud storage, allowing me access to my data from any device. I simply update and save the files back to my cloud. The programs offer various options for saving your data.
Instructions on how to use potterytech.net kiln firing log book